SAML SSO
Configure a SAML service provider against a SenseCrypt tenant — exchange metadata, register your ACS, choose a NameID format, map attributes, and test the flow.
This guide connects a SAML service provider (SP) — your enterprise application — to a SenseCrypt tenant for single sign-on. SenseCrypt acts as the SAML 2.0 IdP; users approve sign-in with an on-device face scan, and your SP receives a standard signed assertion. For the model, see SAML.
Prerequisites
- A SenseCrypt tenant. Its SAML IdP lives on the tenant's issuer host.
- A SAML SP application registered in the SenseCrypt admin console.
- Your SP's entityID and Assertion Consumer Service (ACS) URL.
1. Get the IdP metadata
Each tenant publishes IdP metadata and a downloadable certificate:
GET {issuer}/v1/idp/saml/metadata      # Content-Type: application/samlmetadata+xml
GET {issuer}/v1/idp/saml/certificate   # PEM; optional ?kid=<fingerprint> for a specific cert
Fetch the metadata to confirm what your SP will consume:
curl {issuer}/v1/idp/saml/metadataFrom the metadata you (or your SP) will consume:
- entityID —
{issuer}/v1/idp/saml(deliberately distinct from the OIDC issuer string). - Single Sign-On URL —
{issuer}/v1/idp/saml/sso(supports HTTP-Redirect and HTTP-POST bindings at the same URL). - Signing certificate — RSA-2048, self-signed X.509 (
kid= the certificate's SHA-256 fingerprint).
Point your SP at the metadata URL if it can ingest metadata; otherwise configure the entityID, SSO URL, and certificate by hand.
The metadata advertises WantAuthnRequestsSigned="false" — AuthnRequest signature verification is opt-in per SP (step 2), not global.
2. Register your SP in SenseCrypt
In the admin console, open Applications → New SAML application and give it a display name, your SP's entity ID, and an ACS URL, then pick a billing model.
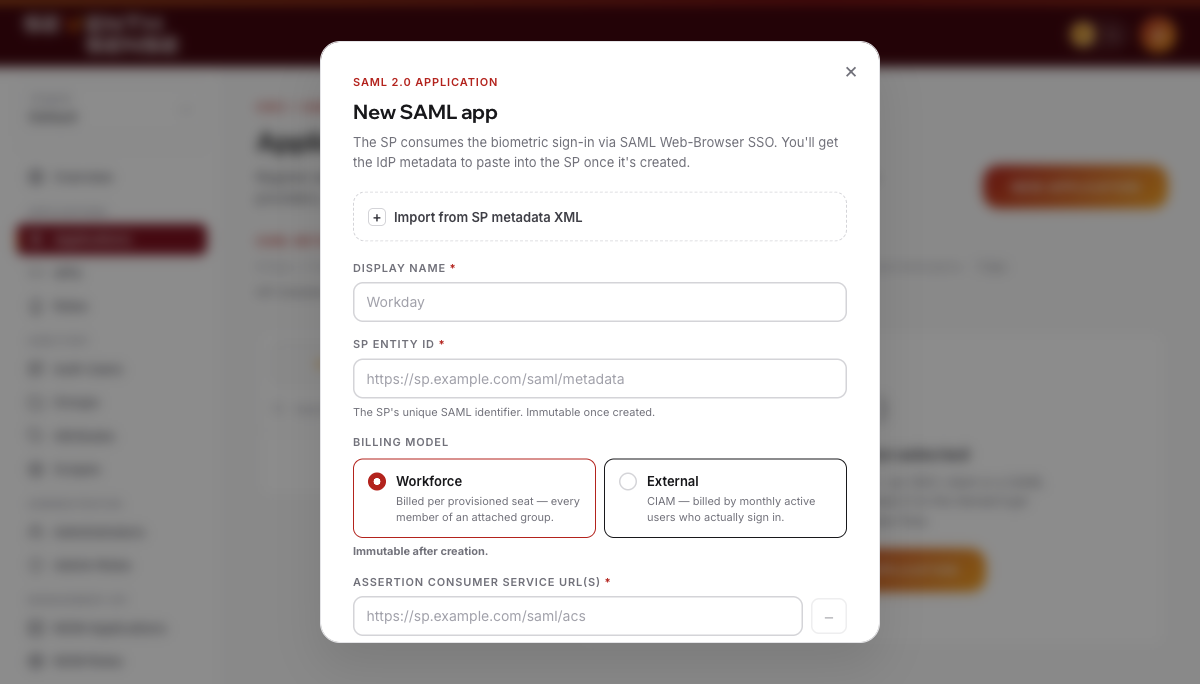
The New SAML application form: display name, SP entity ID, and Assertion Consumer Service (ACS) URL.
Configure the SP with:
- entityID — your SP's entity identifier.
- ACS URL(s) — the allow-list of Assertion Consumer Service URLs SenseCrypt will POST the response to. A requested ACS must match one of these (the SAML analog of an OIDC redirect URI). If the AuthnRequest omits the ACS, the first registered ACS is used.
- (Optional) request-signature certificate — register your SP's signing certificate to have SenseCrypt verify your AuthnRequest signatures. This is opt-in per SP; RSA keys are required.
- (Optional) encryption certificate — register it to receive encrypted assertions (SenseCrypt signs then encrypts).
- (Optional) response signing — enable if your SP requires the outer
<Response>to be signed (the assertion is always signed either way).
You can also paste your SP's published metadata in the console to pre-fill entityID, ACS URLs, NameID formats, and certificates.
3. Choose a NameID format
- Request the
emailAddressformat (urn:oasis:names:tc:SAML:1.1:nameid-format:emailAddress) to receive the user's email as the NameID. - Any other format (persistent, transient, unspecified) yields a stable, opaque identifier for the user.
4. Map attributes
Attribute release is gated by the scopes attached to your SP, then renamed by your attribute map:
- Attach the scopes whose claims you need (for example
profile,email). - In the attribute map, rename each released claim to the SAML attribute name your SP expects. The map only renames — it cannot release an attribute that no attached scope allows.
- Set the per-attribute
NameFormatas your SP requires:unspecified,basic, oruri(Entra ID expectsuri).
5. Test the flow
- Start SSO from your SP (SP-initiated), or use IdP-initiated SSO if you enabled it for the SP.
- SenseCrypt shows the email-entry page, then a QR code.
- The user scans it with the Authenticator app and completes the face scan.
- SenseCrypt POSTs the signed SAML Response to your ACS (HTTP-POST binding), and your SP establishes its session.
The full SP-initiated round-trip — your SP, the browser, the SenseCrypt IdP, and the user's phone — looks like this:
The assertion your SP receives has these properties, which you can check while debugging:
- Signature — RSA-SHA256, SHA-256 digest, exclusive C14N; verify against the certificate from step 1.
<AudienceRestriction>— your SP's entityID.- Validity window —
NotBefore= issue − 30s,NotOnOrAfter= issue + 300s (a 5-minute assertion lifetime). <AuthnContextClassRef>— defaults tourn:oasis:names:tc:SAML:2.0:ac:classes:Biometric(overridable per SP).<SubjectConfirmation>— Bearer method.
Verify it worked
- The SSO round-trip lands the user back on your SP's ACS with an established session.
- Decode the SAML Response (your SP usually logs it) and confirm: the signature validates against the tenant certificate, the
Audienceequals your entityID, the NameID is what you expect (email or opaque id per step 3), and theNotOnOrAfteris ~5 minutes out. - Repeat the sign-in — with a non-email NameID format, the opaque NameID should be identical across sign-ins for the same user (that stability is what you key accounts on).
Troubleshooting
- "AudienceRestriction" / audience mismatch at the SP. Your SP's configured entityID must exactly match the entityID you registered in SenseCrypt (step 2).
- ACS rejected / assertion not delivered. The ACS URL in the AuthnRequest must match one on the SP's ACS allow-list. Add every environment's ACS URL. With no ACS in the request, the first registered ACS is used.
- Assertion expired / clock skew. The assertion lives only ~5 minutes (
NotOnOrAfter= issue + 300s). Ensure your SP's clock is accurate. - AuthnRequest signature rejected. If you enabled request-signature verification, sign with the RSA key whose certificate you registered; ECDSA SP certs are not supported.
- Can't decrypt the assertion. Encrypted assertions use AES-256-CBC with RSA-OAEP (SHA-256) key transport. Confirm your SP's decryption key matches the encryption certificate you registered.
- Access denied before the QR / user can't sign in. The user's email may not be permitted for this SP by the group access gate.
Notes and limits
- Single Logout (SLO) is not supported — there is no IdP-side SSO session, and metadata advertises no
SingleLogoutService. - Delivery is HTTP-POST only (no Artifact binding).
- Request-signature verification and assertion encryption require RSA SP certificates.
- Not implemented:
ForceAuthn/IsPassive,RequestedAuthnContext, and<samlp:Extensions>. - The SAML signing key is rotatable with make-before-break: a new certificate is published in metadata before it starts signing, so an SP that re-fetches metadata trusts either certificate during the overlap.
Next steps
- SAML — the protocol surface and constraints.
- Authorization — how the group access gate decides who may sign in.
- SCIM provisioning — pair SSO with automated user/group provisioning.
Integrations
Task-oriented guides for connecting your application to SenseCrypt — OIDC login, SAML SSO, SCIM provisioning, machine-to-machine, and CIBA.
SCIM provisioning
Provision users and groups into a SenseCrypt tenant from your identity provider over SCIM 2.0 — the base URL, a bearer token, Users and Groups, filtering, and error handling.